Basic Concurrency in Embassy
I've been working with Embassy, the collection of Rust crates for embedded development, and wanted to do a small writeup about how easy it is to accomplish simple concurrency. i.e. running two things at the same time.
👾 I'm not going to delve into the details of how Embassy works under the hood in this article and instead focus on the high-level simplicity.
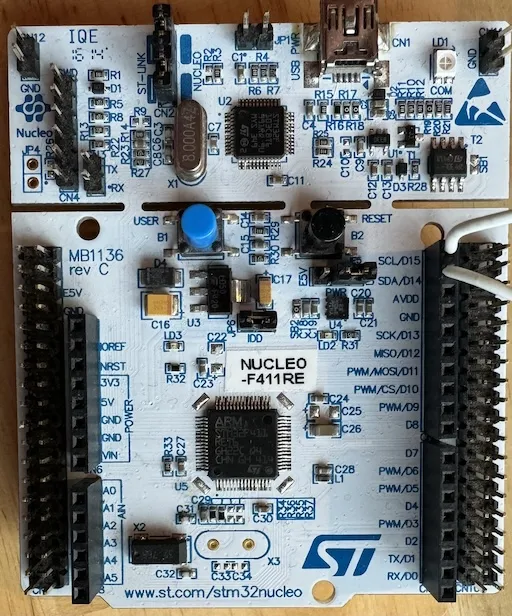
For this example I'm using an older Nucleo-F411RE board which as of today costs about $13. I can't actually believe it's still an active product considering how long I've had it. Embassy seems to have really good support for STM32 chips, and that's great because I like them a lot.
The Goal
For this example I'm going to utilize the single LED on the Nucleo and the blue USER push-button to demonstrate controlling and monitoring two peripherals concurrently.
The LED will blink at a regular interval to provide a heartbeat indicator. The push button task will watch for single short presses or single long presses and indicate which occurred by sending a message to the main loop which is listening. The main loop will then print a message to the debug console.
⚠️ UML isn't perfect, but the operation looks something like this:
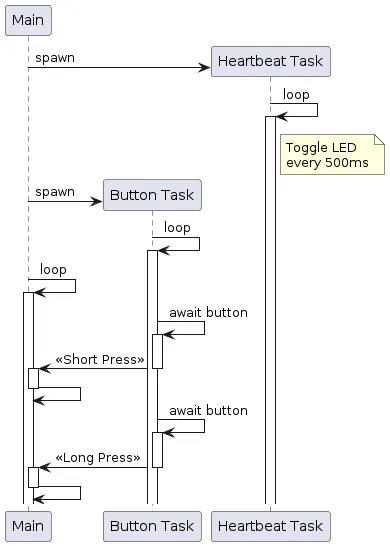
The main function will spawn the two tasks in a non-blocking fashion, and then just await messages sent from the button task. The heartbeat simply runs and toggles the LED port but sends no messages.
Heartbeat Task
The heartbeat_task looks like the following. The #[embassy_executor::task] attribute is important as it tells the Embassy executor that this async function is a task, as opposed to the main function.
/// Heartbeat task that toggles an LED every 1/2 second
#[embassy_executor::task]
async fn heartbeat_task(pin: AnyPin) {
    let mut led = Output::new(pin, Level::High, Speed::Low);
    // Use a ticker instead of a timer because it guarantees that
    // it will fire every interval instead of every interval plus the time it takes
    // to toggle the led.
    // https://github.com/embassy-rs/embassy/blob/main/embassy-time/src/timer.rs#L157
    let mut ticker = Ticker::every(Duration::from_millis(500));
    loop {
        led.toggle();
        ticker.next().await;
    }
}
The gist is that when the heartbeat_task is spawned the main function passes in a peripheral pin that is owned by the task so that it can operate on it. We create an Output type using the pin and assign it to led. From there we can call the output functions like led.toggle() which sets the output to high if it is currently low, or low if it is currently high.
Button Task
The button task is similar in that it also takes a peripheral pin when spawned by main, but takes an external interrupt channel as well because in the background an interrupt is going to wake up the task instead of having to poll the ping for change.
🎩 Manually configuring interrupts to provide this type of behavior in C is not nearly as straight forward without knowing a lot about the underlying hardware architecture.
#[embassy_executor::task]
async fn button_task(pin: AnyPin, exti_chan: AnyChannel) {
    let mut button = ExtiInput::new(Input::new(pin, Pull::Down), exti_chan);
    loop {
        button.wait_for_falling_edge().await;
        match with_timeout(Duration::from_millis(2000), button.wait_for_rising_edge()).await {
            Ok(_) => {
                BUTTON_SIGNAL.signal(ButtonEvent::ShortPress);
            }
            Err(_) => {
                BUTTON_SIGNAL.signal(ButtonEvent::LongPress);
            }
        };
    }
}
Inside the loop we first await the falling edge of the input pin, which occurs when the button is closed/pressed. After that happens we utilize a with_timeout function which takes a Future-generating function, in this case button.wait_for_rising_edge() and awaits it. If the future completes before the timeout then the rising edge occurred and the Ok(_) pattern is matched, so we signal that a ButtonEvent::ShortPress event happened. If the timeout expires before the future completes then we did not get a rising edge and so the button is still being held down, i.e. long press. The Err(_) pattern is matched and we signal that a ButtonEvent::LongPress event happened. The loop will immediately start over and block while awaiting a falling edge.
Main
Main is also straight forward.
#[embassy_executor::main]
async fn main(spawner: Spawner) {
    info!("Two Tasks!");
    let p = embassy_stm32::init(Default::default());

    // Spawn background tasks
    spawner
        .spawn(button_task(p.PC13.degrade(), p.EXTI13.degrade()))
        .unwrap();
    spawner.spawn(heartbeat_task(p.PA5.degrade())).unwrap();

    // Main event loop
    loop {
        match BUTTON_SIGNAL.wait().await {
            ButtonEvent::ShortPress => {
                info!("Short Press Event");
            }
            ButtonEvent::LongPress => {
                info!("Long Press Event");
            }
        };
    }
}
First we declare that the function is the main entry point for the embassy executor. Next we init and get a handle to the STM32 peripherals, followed by spawning the two concurrent tasks. I'm using unwrap() here which will cause a panic if they fail. The result of a panic is configurable, but in this example we don't care so whatever the default is will be fine.
Finally we loop forever awaiting a signal from the button task which we then decode and print to the console.
And that's really it for the main functionality. Here's the entire code listing for completeness.
//! Simple example of two tasks running concurrently.

#![no_std]
#![no_main]

use defmt::*;
use embassy_executor::Spawner;
use embassy_stm32::exti::{AnyChannel, Channel, ExtiInput};
use embassy_stm32::gpio::{AnyPin, Input, Level, Output, Pin, Pull, Speed};
use embassy_sync::blocking_mutex::raw::CriticalSectionRawMutex;
use embassy_sync::signal::Signal;
use embassy_time::{with_timeout, Duration, Ticker};
use {defmt_rtt as _, panic_probe as _};

/// Global state
/// The signal generated by a button press
static BUTTON_SIGNAL: Signal<CriticalSectionRawMutex, ButtonEvent> = Signal::new();

enum ButtonEvent {
    ShortPress,
    LongPress,
}

/// Main Task
#[embassy_executor::main]
async fn main(spawner: Spawner) {
    info!("Two Tasks!");
    let p = embassy_stm32::init(Default::default());

    // Spawn background tasks
    spawner
        .spawn(button_task(p.PC13.degrade(), p.EXTI13.degrade()))
        .unwrap();
    spawner.spawn(heartbeat_task(p.PA5.degrade())).unwrap();

    // Main event loop
    loop {
        match BUTTON_SIGNAL.wait().await {
            ButtonEvent::ShortPress => {
                info!("Short Press Event");
            }
            ButtonEvent::LongPress => {
                info!("Long Press Event");
            }
        };
    }
}

/// Heartbeat task that toggles an LED every 1/2 second
#[embassy_executor::task]
async fn heartbeat_task(pin: AnyPin) {
    let mut led = Output::new(pin, Level::High, Speed::Low);
    // Use a ticker instead of a timer because it guarantees that
    // it will fire every interval instead of every interval plus the time it takes
    // to toggle the led.
    // https://github.com/embassy-rs/embassy/blob/main/embassy-time/src/timer.rs#L157
    let mut ticker = Ticker::every(Duration::from_millis(500));
    loop {
        led.toggle();
        ticker.next().await;
    }
}

/// Task that just looks for long or short button presses
///
/// Long press is hard-coded as >= 2 seconds
///
/// Only one event signal will be sent after the long press no matter how long
/// the button is held down.
#[embassy_executor::task]
async fn button_task(pin: AnyPin, exti_chan: AnyChannel) {
    let mut button = ExtiInput::new(Input::new(pin, Pull::Down), exti_chan);
    // Do we need to debounce or is that done by Embassy?
    loop {
        button.wait_for_falling_edge().await;
        // info!("FALLING EDGE");
        match with_timeout(Duration::from_millis(2000), button.wait_for_rising_edge()).await {
            Ok(_) => {
                BUTTON_SIGNAL.signal(ButtonEvent::ShortPress);
            }
            Err(_) => {
                BUTTON_SIGNAL.signal(ButtonEvent::LongPress);
            }
        };
    }
}
Configuration for Hardware
Install the probe-rs tool which allows us to program and interact with the running code on the actual hardware.
We need to tell Cargo how to run the binary and we do that by creating a .cargo/config.toml with the following lines.
[target.'cfg(all(target_arch = "arm", target_os = "none"))']
# replace STM32F429ZITx with your chip as listed in `probe-rs chip list`
runner = "probe-rs run --chip STM32F411RETx"

[build]
target = "thumbv7em-none-eabi"

[env]
DEFMT_LOG = "trace"
See the comment about how to determine what chip it should target? Here's how I found the exact chip for this particular Nucleo. I know that it's a STM32F411 so I searched for just 411 in the output.
probe-rs chip list | ag 411
        MSP432E411Y
        MSP432P4111
        MSP432P411V
        MSP432P411Y
        STM32F411CCUx
        STM32F411CCYx
        STM32F411CEUx
        STM32F411CEYx
        STM32F411RCTx
        STM32F411RETx <--
        STM32F411VCHx
        STM32F411VCTx
        STM32F411VEHx
        STM32F411VETx
There were quite a few 411 boards, but my particular one is a NUCLEO-F411RE as shown on the sticker in the first image. So the only RE variant is the STM32F411RETx, so the odds are good that's the right one to target.
Once those things are setup we just run the binary which will erase, program, and run the code all in one go.
╭─○ …/pomodoro-af on main
╰─𝝨 cargo run --bin two_tasks
Finished dev [unoptimized + debuginfo] target(s) in 0.09s
Running `probe-rs run --chip STM32F411RETx target/thumbv7em-none-eabi/debug/two_tasks`
Erasing ✔ [00:00:02] [###############] 128.00 KiB/128.00 KiB @ 48.98 KiB/s (eta 0s )
Programming ✔ [00:00:02] [#################] 89.00 KiB/89.00 KiB @ 30.63 KiB/s (eta 0s ) Finished in 5.543s
You can see from the video that after the programming has completed the green LED flashes each second as expected. Pushing the button once causes the Short Press Event message to be sent to the console, and pressing and holding the button causes the Long Press Event message to be sent to the console.
That's all for now!